Ever noticed your computer slowing down significantly? You might have checked the Task Manager and found a process named “MoUSO Core Worker Process” consuming a hefty chunk of your CPU and RAM.
So, what exactly is this process, and why is it eating up your system resources? This article will dive deep into understanding the MoUSO Core Worker Process and explore ways to fix its high CPU and RAM usage.
Table of Contents
What is Windows 10’s MoUSO Core Worker Process?
MoUSO is an Update Session Orchestrator (USO) that appears in the Task Manager every time Windows checks for updates. Depending on your power configuration, it might show up as either MoUsoCoreWorker.exe or USOCoreWorker.exe. They’re replacement programs for the wuauclt.exe command in Windows 10.
This procedure monitors the status of various updates as they go from notification to installation. This monitoring is usually done in the background and should not cause any problems during normal use.
Windows will periodically search for updates in the background if you have automatic updates. This causes your computer to wake up from sleep mode and, if not configured properly, may slow down your system.
Is the MoUSO Core Worker Process Malware?
No, it’s safe. The MoUSO Core Worker Process is a Microsoft-made program that comes with Windows when it’s installed on your device. This means the process cannot harm your system in any direct way, and you don’t need to worry about removing it.
However, because of the potential increased CPU or disk usage, it could have some harmful effects if you let the process run rampant for an extended period of time. Some users have reported that, in extreme cases, it may harm your SSD drive.
What Causes MoUSO Core Worker Process High Memory/Disk/CPU Usage?
Causes MoUSO Core Worker is configured to run in the background and doesn’t impact other processes the user is running. Normally, it uses 8 to 9 MB of memory. However, the MoUSO Core Worker Process sometimes uses a lot of system memory due to download or installation errors of Windows updates. In some cases, it may also cause high CPU and Disk usage.
Our research has revealed that MoUSO Core Worker causes high memory, CPU, or disk usage due to the issues listed below.
- The MoUsoCoreWorker.exe process is outdated. The process may be outdated, but installing the latest Windows updates should fix it.
- The Pending updates have been blocked.
- The Windows update is in the wrong state.
How to fix MoUSO Core Worker Process High Disk/CPU Usage
Here are some things you can do if the MoUSO Core Worker Process depletes your resources. Although the process itself cannot be removed, you can troubleshoot some issues that may cause it to excessively use your CPU, disk, or memory.
1. Verify the Authenticity of the Process
The first thing to do is to confirm that the executable file is from Microsoft rather than a Trojan installed by a cybercriminal. The hackers commonly use the same names as the original processes, making it difficult to identify them.
To verify the authenticity of any executable file, follow the below steps:
- Right-click the Windows Start button and select Task Manager.
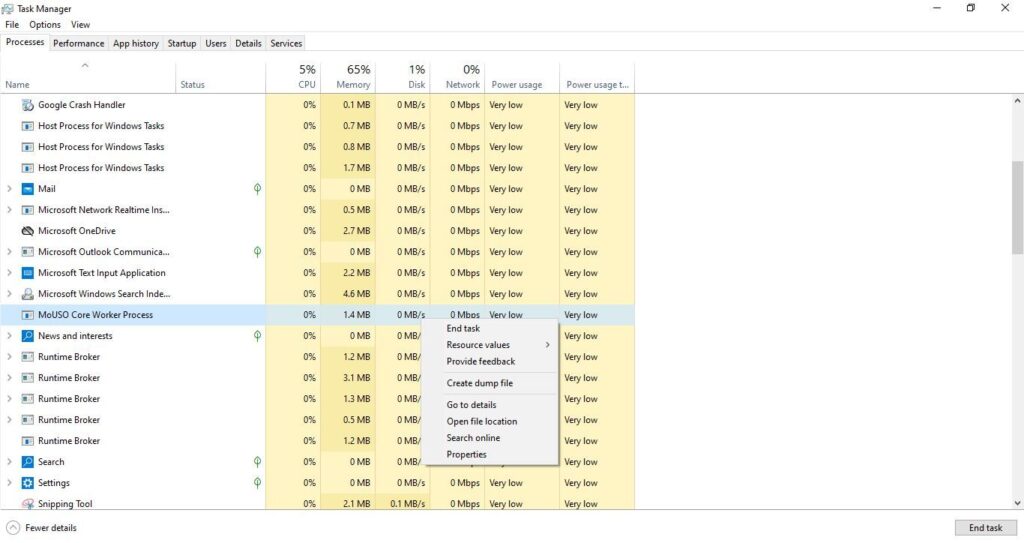
- Right-click on MoUSO Core Worker Process and select Properties.
- Under the General tab of the Properties window, copy the path next to Location.
- Paste the copied path into the address bar of File Explorer.
- Find the executable file for the process.
- Right-click it and select Properties.
- In the Properties window, navigate to the Details tab.
- Confirm that “Microsoft Corporation. All rights reserved” is written next to Copyright.
2. Restart the MoUSO Process
The old-school approach of restarting the program to fix issues may also work here. Therefore, you should give a fresh start to the process before implementing any major fixes. You can restart the process by following the below steps:
- Right-click on the Windows Start button and select Task Manager.
- Right-click the MoUSO Core Worker Process and hit End task.

Image source: Makeuseof
Restart your computer to give the process a fresh start. If restarting the process fails to lower CPU or RAM consumption, try the following fix.
3. Check for Available Updates and Install or Pause Them
Manually installing the available updates will reduce the burden on the MoUSO Core Worker Process. Consequently, it will reduce the process’s resource consumption. So, check for updates and let Windows install them. It is also essential to check for and install the optional Windows updates if they are available.
If installing automatic and optional updates doesn’t fix the issue, pause the Windows updates and see if that helps.
4. Run the Windows Update Troubleshooter
A handy Windows Update troubleshooter included in Windows can help you resolve any issues related to Windows updates. Therefore, run the troubleshooter to see if it helps identify the problems and fix the high resource consumption.
Follow the below steps to run the troubleshooter:
- Right-click the Windows Start button and select Settings.
- Go to Update & Security.
- Select the Troubleshoot tab in the left sidebar.
- In the right-hand pane, click Additional Troubleshooters.
- Select Windows Update under Get up and running.
- Click on Run the troubleshooter.
Check if the Windows Update troubleshooter has identified any problems and reduced resource consumption.
5. Disable Delivery Optimization
Delivery Optimization allows Windows users to download new updates or parts of updates from other PCs on the same network. This makes new updates more accessible.
However, since the USO Core Worker Process manages Windows updates and their installation, the extra burden of downloaded updates from other machines can make the process incredibly resource-intensive.
To rule out this possibility, disable Delivery Optimization. For this, go to the Windows Settings app > Update & Security > Advanced Options > Delivery Optimization. If it is on, turn the toggle next to Allow downloads from other PCs to the left to turn it off.
6. Restart Relevant Windows Update Services
Restarting services in the Windows operating system has a good chance of resolving common issues. Windows Update and Update Orchestrator Service are the most relevant services to restart to resolve the issue.
You can restart the Windows Update service by following the steps below:
- Open the Services app by searching for “Services” in the Windows search bar.
- In the right-hand pane, locate the Windows Update service.
- Simply right-click it and hit Restart.
Next, restart the Update Orchestrator Service by following these steps:
- In the Services app, locate Update Orchestrator Service.
- Right-click on it and hit Restart.
Is the process still consuming too much power? Then it’s time to disable the service.
7. Disable the Update Orchestrator Service
As a last resort, disable the Update Orchestrator Service to terminate the MoUSO Core Worker Process. Follow the below process to disable it:
- Open the Services app.
- Within the Service app, locate the Update Orchestrator Service.
- Right-click on it and select Properties.
- Select Disabled from the dropdown next to Startup type on the General tab.
- Once you’ve done that, click Apply and then OK.
Disabling this service should stop the MoUSO Core Worker Process. If it doesn’t work, you can go back to Task Manager and end it there. Disabling the service will prevent it from running in Task Manager ever again.
READ ALSO: 8 Best Free Driver Updater Tools
Conclusion
The MoUSO Core Worker Process plays a crucial role in managing Windows Updates, but it can sometimes consume excessive CPU and RAM, impacting system performance.
It is a process that Windows requires to keep the system safe from ever-increasing system threats. As a result, we only recommend uninstalling it if it is a virus.
However, if it is not a virus and you are deleting it due to high resource usage, we propose that you upgrade your system following Microsoft’s instructions.
While disabling MoUSO Core Worker Process will reduce resource consumption, it will also stop looking for new updates, which may adversely affect the performance of your device.
FAQs
MoUSO Core Worker Process is a Windows Update Session Orchestrator (USO) that manages update sessions. Managing the Update session entails resolving any difficulties that may prevent the Windows update process from continuing. When running a Windows update, this procedure also protects the operating system from potential dangers.
You can deactivate the USOCoreWorker.exe process if it causes excessive CPU utilization or overheating. You may accomplish this by utilizing the Services application.
Right-click on the Services entry in the results and select Run as administrator. Select Properties from the context menu when you right-click on the Update Orchestrator Service. Select Disabled from the Startup type. Click the OK button.
The MoUSO Core Worker Process manages and orchestrates Windows Update sessions to ensure smooth downloading and installation of updates.