AirDrop is a feature on Apple devices that allows a sender to send data to another Apple device quickly. As long as the recipient’s device is in range of the sender’s, AirDrop will work properly.
Changing your AirDrop name can make sharing files between Apple devices more personal and organized.
Whether you want to update it for privacy reasons or just to make it more recognizable, this guide will show you how to easily change your AirDrop name on your iPhone, iPad, and Mac.
Table of Contents
How to Change AirDrop Name on iPhone or iPad
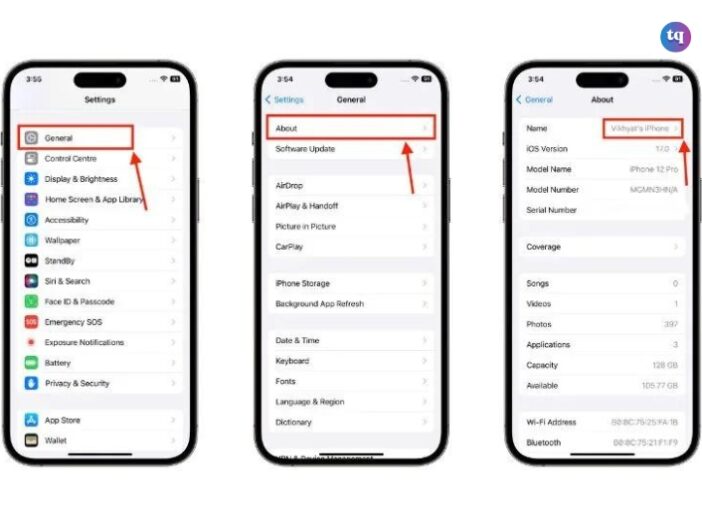
Earlier, changing the AirDrop name on your iPhone was a bit more of a complex task as it required you to make changes to your contact card. However, with iOS 16, Apple made the process a lot simpler, as you just need to change your iPhone’s name now and the same reflects on your AirDrop. Here’s how:
1. Open the “Settings” app on your iPhone or iPad.
2. Locate and tap the “General” section.
3. Here, tap the “About” option, then tap “Name.”

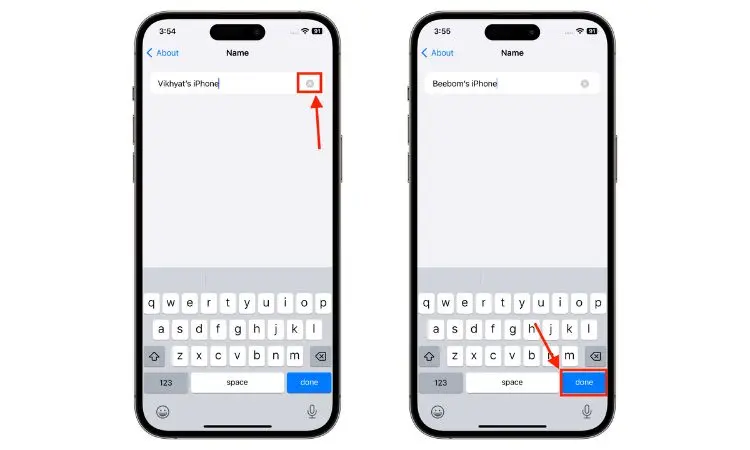
4. Now, tap the “X” icon to remove the current AirDrop name, then add the new Name, and tap Done.
How to Change AirDrop Name on Mac
Like iPhone and iPad, the steps to change the AirDrop name on Mac are also pretty straightforward, and you can do so in just a few clicks. Here’s how you can:
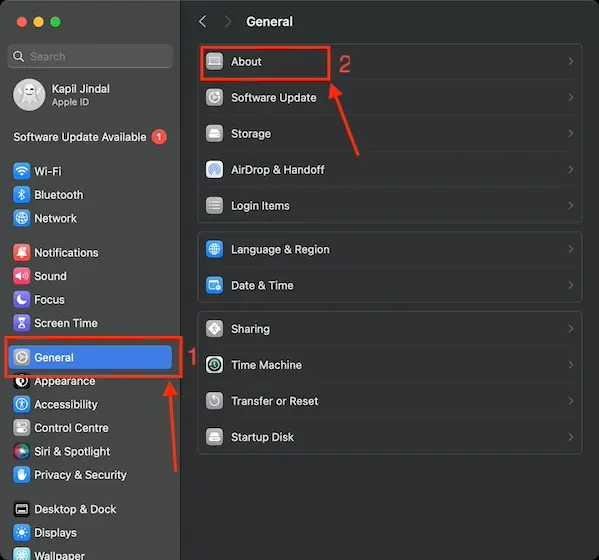
1. Launch the “System Settings” on your Mac.
2. Click the General from the left tab, then click the About option.

Image Source: beebom
3. Now, Select your Current MacBook Name and type in the New Name.
What to do if You’re Unable to See Other Devices
You now know how to change your device’s name to avoid being lost among the other devices when attempting an AirDrop. You even know how to do so on your Mac. But what happens when a device doesn’t appear in the AirDrop window?
If you’re attempting to AirDrop content from one device, but the recipient’s device doesn’t appear, you must ensure both devices have WiFi and Bluetooth turned on. You’ll also want both devices to be within 30 feet (9 meters) of each other.
This is usually all that needs to be done, but there are times when the basics won’t fix the problem. We’ll need to tinker with the device’s settings.
Troubleshooting tips for iPhone, iPad, or iPod touch:
- Head to Control Center to check your AirDrop settings. If you’ve set AirDrop to receive content from “Contacts Only,” both devices must be signed in to iCloud. Also, the email address or phone number associated with the sender’s Apple ID must be in the Contacts app of your iOS device.
- If the AirDrop option for the device doesn’t come up, you may need to change from “Contacts Only” to Everyone to be discoverable.
- Turn off Personal Hotspot when attempting to use AirDrop. You can turn it off by going into Settings > Cellular of the recipient’s iOS device.
Fixing the problem on Mac:
- Make sure that AirDrop is turned on by going into Finder and clicking Go > AirDrop from the menu bar.
- Check the Allow me to be discovered by setting it at the bottom of the AirDrop window.
- Earlier Macs (2012 or earlier) should click Don’t see who you’re looking for? in the AirDrop window or sharing sheet of the sharing Mac. Follow this up by clicking on Search for an Older Mac.
- Make sure that Block all incoming connections is turned off in the Security & Privacy preferences of the receiving Mac.
How to Turn on AirDrop
If you’ve never used AirDrop on your Apple device, it might be turned off, which can prevent you from receiving files from nearby devices. Here’s how to turn it on:
Turn on AirDrop on iPhones and iPads
- Navigate to Settings > General > AirDrop.
- Select Contacts Only if you’d like your contacts to be able to send you files when they’re nearby, without you having to turn it on manually. If the sender can’t see your phone or iPad, check that you are in each other’s contacts list and that your email address and phone number are linked to your Apple ID and iCloud.
- Select Everyone for 10 minutes if you’d like all nearby devices to be able to send you files. However, keep in mind this option is not recommended in crowded places, such as planes and malls, as it makes your phone or iPad visible to all Apple devices in the area.
Turn on AirDrop on a Mac
- The easiest way to open AirDrop on a Mac is to open Finder and press Command+Shift+R on your keyboard.
- At the bottom of the page, click on Allow me to be discovered by.
- Select Contacts Only if you’d like your contacts to be able to send you files when they’re nearby, without you having to turn it on manually. If the sender can’t see your Mac, make sure you are in each other’s contacts list and that your email address and phone number are linked to your Apple ID and iCloud.
- Select Everyone if you’d like all nearby devices to be able to send you files. While not recommended in crowded places, this option is less risky than on an iPhone because AirDrop automatically closes when you close the window.
READ ALSO: How to Share Your Screen in FaceTime
How to Send and Receive Files Using AirDrop
AirDrop simplifies file sharing, allowing you to easily send files from one Apple device to another without needing additional software. Here’s how to do it.
- On iOS: When sending a file, the AirDrop menu appears on the screen. Tap it and select the device to send it to.
- On Mac: The easiest way to open AirDrop on a Mac is to open Finder and press Command+Shift+R on your keyboard. From there, you’ll see the list of nearby devices. Simply drag and drop the file you’d like to share on the device’s icon, and you’re all set.
Conclusion
Airdrop is an extremely useful tool for users of the Apple ecosystem. Changing your AirDrop name is a quick and easy way to personalize your device, enhance your privacy, and stay organized.
Whether you’re using an iPhone, iPad, or Mac, these simple steps will help you update your AirDrop name in no time. Now, you can share files with confidence, knowing your device is easily identifiable.
FAQs
No, changing your AirDrop name only affects how your device is identified during AirDrop transfers. It does not impact other settings.
Apple has kept your AirDrop visibility confined to your contacts only, but you can change it to everyone from settings.
Go to Settings -> General -> AirDrop
On an iPhone, AirDropped photos will go to your Photos app. Similarly, all files sent to you via AirDrop will be stored in their corresponding app on your iPhone. On a Mac, AirDropped files, including photos, are stored in the Downloads folder.