You just got a new iPhone; congratulations! You are so excited about using it and can’t wait to transfer all your documents from your Android to your new phone.
That’s a pretty good feeling. But there’s a problem.
You can conveniently transfer your other stuff from Android to your iPhone, but your contacts wouldn’t magically move. And to worsen the situation, your iPhone isn’t accepting your current SIM card.
So the big question is, “How can I transfer my contacts from Android to iPhone”?
If this looks like a situation you’re in right now, there’s no need to worry because you’ve come to the right place.
This article shows how you can transfer contacts from Android to iPhone without losing one.
So, without wasting time, here are 6 significant ways to transfer your contacts from Android to iPhone in no time.
- By using the “Move to iOS” app
- By syncing your Google account to your iPhone
- Import your contacts to your iPhone using a SIM card
- Using a vCard File
- By using contact transfer on PC
- By using Droid transfer and iTunes on PC
Table of Contents
#1. Transfer your contacts using the “Move to iOS” app

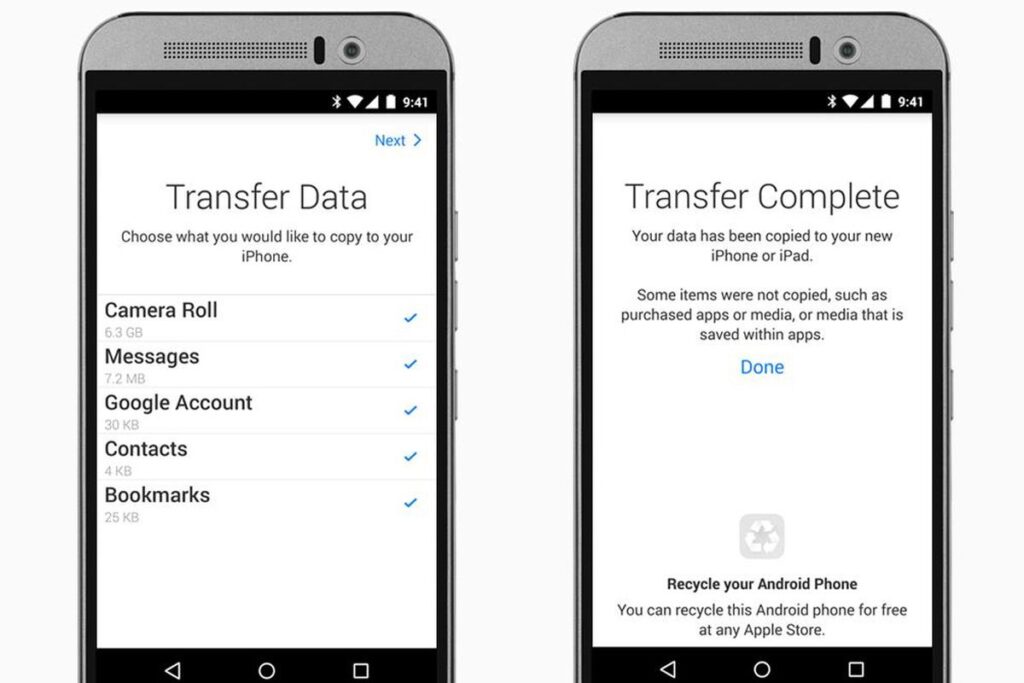
The first method of switching your contacts to your iPhone is to use Apple’s own “Move to iOS” app.
This app is free and is a great way to transfer content from your Android phone to your iPhone.
Not only can you transfer your contacts with this app, but it also lets you copy all your data, including contacts, calendars, photos, and email accounts.
Here’s how to use the “Move to iOS” app;
- Install the “Move to iOS” app on your Android device (Your device must be using an Android 4.0 or higher)
- Turn on your new iPhone and follow the steps to set it up. Connect to your Wi-Fi network when prompted.
- On the “Apps & Data” step, choose “Move Data from Android”
- Take note of the security code displayed on your iPhone.
- Start the “Move to iOS” app on your Android
- Enter the security code shown to you on your iPhone on your Android.
- Select the data you want to transfer to your iPhone. Ensure your contacts are selected.
- Then follow the instructions to complete the transfer.
The downside to this app is that it is only useful when setting up a brand-new iPhone. This means that if you’ve already completed the setup of your iPhone, you’d have to use the other methods mentioned in this article.
#2. By syncing your Google account to your iPhone

This is a good option if you save your contacts on your Google account. Syncing your contacts to your Google account stores them in the cloud.
This way you can access your contacts on any device as long as you’re signed in to your Google account.
Here’s how to transfer your contacts from your Android to your iPhone using your Google account.
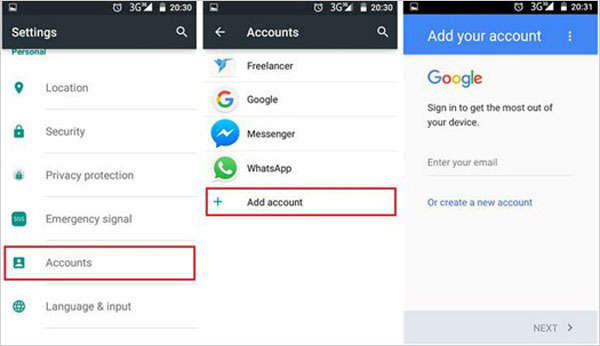
- First, check to make sure that your Android contacts are synced with Google. To do this, go to Settings > Accounts > Google > Sync. If you get the option to sync certain content, ensure that “Sync Contacts” is enabled.
- On the iPhone, open the Settings app.
- Scroll down to “Passwords & Accounts”
- Tap “Add Account” and add your Google account
- Ensure that you enable contacts when setting up your account,
- Once your account has been added, it will automatically sync all your Google info, including your contacts.
This is a good option to transfer your contacts to your iPhone, as it works for both a new iPhone and one that has already been set up.
#3. Import your contacts to your iPhone using a SIM card
Another option is to use your Android SIM card as a device to transfer your contacts.
This is most likely the easiest solution as it involves physically swapping your SIM card between the two phones.
This option can work if your iPhone will accept the SIM card from your Android device or if the SIM card will fit in your iPhone.
Here’s how to use your SIM card to transfer contacts to your iPhone.
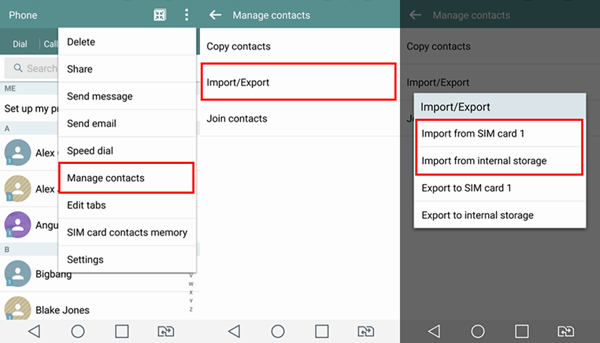
- If your contacts are not already saved to your SIM, export them from the Android device.
To do this, open the contacts app on your Android > open the menu > Tap Export > Select your SIM card. - Remove the SIM card from the Android phone and Insert it into your iPhone
- On the iPhone, start the Settings app.
- Tap “Contacts”
- Tap “Import SIM contacts”
- Choose the account on which you want to store the contacts.
- Wait for your iPhone to import your SIM contacts.
#4. Import your contacts using a vCard File

Using a vCard FIle is a good option if some of your contacts aren’t in a Google account or if you just want to transfer a few contacts.
This process involves exporting contacts from your Android, sending the export to your iPhone, and then importing the contacts from the file.
Here’s how to do so.
- Open the Contacts app on your Android and open the menu
- Choose to Export your contacts and select Internal Storage as the destination.
- Once the export is complete, locate the VCF file on your phone (you can search for the file in your Android’s file browser if you can’t locate it easily).
- Tap the menu icon or the file, then select Share. There are several ways to share the file but the best is through email.
- Send the file to your email address. Then, download the attached file on your iPhone.
- Finally, open the file. At this point, your iPhone will prompt you to “Add all contacts” from the file.
#5. By using contact transfer on your PC
Another option to transfer contacts to your iPhone is by using the contact transfer software on your PC.
Contact transfer, in conjunction with the free Contact Transfer Android app, allows you to transfer contacts straight from your Android device to your iPhone.
This tool can conveniently transfer contacts between Android, iPhone, and Windows PC. It can even add, edit, and delete contacts.
Here’s how to use it.
- Get the Contact Transfer software on your PC and the Contact Transfer Android app from the Google Play Store.
- On Contact Transfer on the PC, select Android as your source and iPhone as your destination device, then click continue.
- Connect your devices;
For Android, open the Contact Transfer app on your Android and tap “Scan Contact Transfer QR Code.” Then, use your device’s camera to scan the QR code shown in Contact Transfer on your computer.
For iPhone, use your iPhone’s USB cable to connect it to your PC
Then click Continue. - Select the contacts you wish to transfer. Or you can click all checkboxes to select all the contacts from your list.
- Click Transfer.
#6. By using Droid transfer and iTunes on a PC
Another option you can use on your PC is the Droid Transfer software for managing Android files. The Windows program offers lots of amazing features to help you manage your Android files on your PC.
With the Droid Transfer, you can export contacts to your PC, transfer them to another phone, delete contacts from your phone, and lots more.
To transfer contacts from Android to iPhone, you’d need to export contacts to your PC and then sync the contacts with iPhone using iTunes.
a. Export Android contacts to PC
Here’s how this works;
- Download Droid Transfer and connect your device using a Wi-Fi or USB cable
- Click on contacts
- Click “copy contacts…” then “copy to contacts” to export all your contacts to the Windows Contacts app.
You can copy all your contacts by clicking “copy contacts” without selecting anyone or clicking a contact, then using Ctrl+A on your keyboard.
Alternatively, you can select some contacts to export if you don’t want to transfer all of them to your iPhone.
Once you’ve exported them, you can now sync them with your iPhone.
b. Sync Contacts from PC to iPhone using iTunes
Here’s how this works:
- Open iTunes and connect your iPhone
- Click your device icon, then select the info tab from the list on the left.
- Tick the box “Sync Contacts With” and select “Windows Contacts” from the drop-down menu.
- Click Apply to sync your contacts from Windows Contacts to your iPhone.
Bottom Line
There are lots of ways to transfer contacts from your Android to your iPhone without stress. All you need to do is choose which method best works for you.
I hope this article helps you carry out a smooth transfer.
All the best!
Frequently Asked Questions
The maximum amount of contacts you can sync to iCloud is 50,000.
The maximum amount of contacts you can sync to Google is 25,000.
While the Move to IOS app is meant to be the easiest method for transferring contacts from Android to iOS, we would argue using Google Sync is easier. Chances are you’re already syncing your contacts to Google, so all you might need to do is sign into your Google account on your iPhone.
You can transfer individual contacts by using the VCF file method.
To transfer contacts from iPhone to Android, upload your iPhone contacts to iCloud: Go to Settings > your name > iCloud and slide Contacts to On. Go to iCloud.com to ensure your contacts are all there. On your Android, install an app that can download iCloud contacts, such as Synchronize Cloud Contacts, and follow the steps to download your contacts.
Using iCloud is the easiest method to transfer contacts from iPhone to iPhone. Ensure both iPhones are signed in with the same Apple ID. On both phones, open Settings, tap your name, then tap iCloud. Slide Contacts to the On position. If asked, select the option to merge contacts so nothing is lost.
The easiest method is using your Google account. On the old Android, go to Settings > Accounts, select your Google account, and tap Account Sync. On the next page, ensure Contacts is enabled. Log in to the same Google account on your new Android, and all your contacts will be accessible.
COPYRIGHT WARNING! Contents on this website may not be republished, reproduced, or redistributed either in whole or in part without due permission or acknowledgment. All contents are protected by DMCA.
The content on this site is posted with good intentions. If you own this content & believe your copyright was violated or infringed, make sure you contact us at [techqlik1(@)gmail(dot)com], and actions will be taken immediately.