Dealing with computer errors can be frustrating, especially when they disrupt your workflow. One common issue that Windows 10 users encounter is the DistributedCOM error 10016.
This error typically involves permissions and settings related to certain applications or services. Fortunately, there are steps you can take to troubleshoot and fix this error.
But first, let’s take a look at what distributedCOM error 10016 is and what is responsible for it.
Table of Contents
What is DistributedCOM?
The DistributedCOM also known as DCOM (Distributed Component Object Model) is a vital aspect for facilitating a set of protocols that allows internetworking between programs on computers with the Windows operating system.
Widely accepted as a patent technology developed by Microsoft, it kick-starts when an application is hooked up to the World Wide Web. The Distributed Object Model is capable of accessing the information on RAS (remote access servers) unlike the traditional COM, only capable of accessing information stored in the same machine.
What Causes DistributedCOM Error 10016?
The distributedCOM error 10016 server 2016 is by design and occurs when Microsoft components attempt to issue a request through the Distributed Object Model without the required permission to do so.
However, it is safe to ignore a distributedCOM error as they don’t in any way disrupt the functionality of your system. Although these errors could be suppressed by a user, ignoring these events is the recommended action.
How to Fix The DistributedCOM Error 10016 in Windows 10
Here are a few steps to fix the distributedCOM error 10016
1. Edit the Windows Registry to Fix DCOM Error 10016
The first port of call is the Windows Registry. A simple registry tweak can sometimes fix the DCOM Error 10016 immediately.
Before editing the registry, we recommend taking a Windows backup.
Type ‘registry’ in your Start menu search bar, and select the Best Match. Head to File > Export, set the Export Range to All, then Save the Windows Registry to a handy location. The following fix won’t damage your computer, but it is best to take a backup to restore from an unexpected error.
Now, let’s attempt the fix.
- Type in ‘registry’ in your Start Menu search bar, and select the Best Match.
- Navigate to HKEY_LOCAL_MACHINE\SOFTWARE\Microsoft\Ole. You can copy and paste the address into the Registry Editor address bar.
- Delete the following four registry keys:
DefaultAccessPermission
DefaultLaunchPermission
MachineAccessRestriction
MachineLaunchRestriction
- Close the Windows Registry Editor, then reboot your system.
That’s it. Do this and your system should remain DCOM Error 10016 free from now on.
2. Enable DCOM Permissions for Specific Error
If that doesn’t work, there is a substantially longer workaround that you can follow. However, if you have several individual applications providing DCOM errors, the following process will take some time as you have to repeat the majority of it for each error.
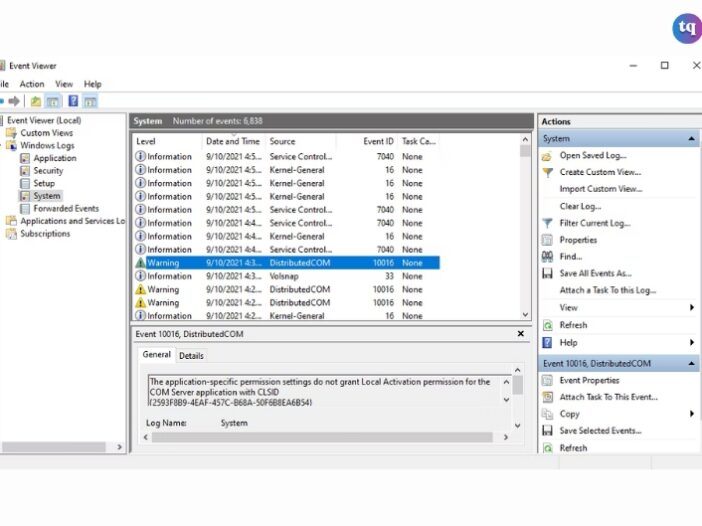
The DCOM Error 10016 error message in the Event Viewer contains information regarding the specific application or process creating the issue.
Input ‘event viewer’ in your Start menu search bar, and select the Best Match.
Head to Windows Logs > System and locate your most recent DCOM Error 10016. Double-click the error message to expand it.
The General tab explains the reason for DCOM 10016 error, listing the CLSID (Class ID) and APPID (Application ID). The CLSID and APPID character strings look random. However, you can use them to identify which application or service is the route of the 10016 error.
Locate CLSID and APPID in the Registry Editor
Here’s how you locate the service in the Registry Editor.
First, highlight the CLSID in the Event Viewer, then press CTRL + C to copy it. Then, open the Registry Editor. Search the registry for the following:
HKEY_CLASSES_ROOT\CLSID\{Paste Your CLSID Here}
For us, that looks like HKEY_CLASSES_ROOT\CLSID\{2593F8B9-4EAF-457C-B68A-50F6B8EA6B54}.
Remember, you can copy and paste the address into the Registry Editor address bar. Once the CLSID search finishes, you can cross-reference the APPID from the error message with the AppID listed under the CLSID.
In our case, the DCOM Error 10016 stems from the Runtime Broker, which is one of the most common causes of this error.
Edit the CLSID Permissions
In the left-hand list of registry entries, right-click the CLSID relating to the error, then select Permission > Advanced. From here, you can edit the Permissions of the service. (Changing file permissions can fix a bunch of other Windows 10 issues, too.)
Highlight Administrators and select Edit. Switch the Basic Permissions to include Full Control, then hit OK > Apply > OK.
Now, restart your system.
Once the restart completes, input Component Services in your Start Menu search bar and select the Best Match. Head to Computers > My Computer > DCOM Config.
You will see a long list of services that use DCOM in some manner. Locate the service using the name and APPID, right-click, and select Properties > Security.
Under Launch and Activation Permissions, select Edit > Add > Add a Local Service > Apply. Now, tick the Local Activation box, hit OK, and reboot your system again.
Whew! All done, the process is complete.
Note: Unfortunately, if you have multiple 10016 error causes, you’ll have to complete this process for each CSLID/APPID combination.
Conclusion
Resolving the DistributedCOM error 10016 in Windows 10 requires a systematic approach to adjust permissions, settings, and registry keys.
By following these steps and ensuring that the user account has the necessary permissions, you can effectively troubleshoot and fix this error, allowing you to use your system smoothly without interruptions.