To share your images with anyone, you may need to change file types. Discover how to convert HEIC photos on your Mac to JPG images.
Perhaps you’ve discovered a HEIC file on your computer and don’t know what it is or how to convert it to another image format. Macs occasionally store files in the HEIC format, which may be incompatible with certain programs or unsuitable for sharing with others.
There is nothing you need to do to share HEIC photographs with other iPhones and Macs, but not all phones, devices, and computers are compatible with this file format. However, you can effortlessly convert HEIC photographs to JPGs and share them with anyone, regardless of their device. Read on to find out how to convert HEIC to JPG on a Mac.
Table of Contents
What is the HEIC file?
The default format for saving pictures on iPhones and Macs is HEIC. It provides high compression while requiring relatively little storage space and producing high-quality photos.
HEIC, introduced with iOS 9, is a new image format designed to be more efficient than previous file types. It stands for High-Efficiency Image Container and is a variant of HEIF (High-Efficiency Image File Format).
HEIC files are approximately half the size of JPGs while providing higher quality. HEIF and HEIC can be found in macOS versions ranging from High Sierra (OS X 10.13) to Monterey 12.
Why would you convert a HEIC file to a JPG?
HEIC files allow you to store your photographs in compact sizes while maintaining their quality. They are not natively supported by any products other than Apple. This implies that specific software must be installed on a PC to see them.
JPGs may lose image quality when compressed or severely manipulated. But they’re globally accepted and may be seen on any device, including web browsers. The main reason you’d want to convert HEIC to JPG is to share your image and let others see it.
Apple created the HEIC format to conserve space on photos. HEIC files are almost half the size of JPG files, but they include more information. However, conversion has become required due to compatibility difficulties with the rest of the digital world.
Quality Preservation
The HEIC to JPG converter preserves image quality when converting. It assures that the converted JPEG photos have the same sharpness, brightness, and detail as the original HEIC files.
EXIF Metadata Retention
EXIF metadata contains information about camera settings, date and time, and location. Throughout the conversion process, it remains unchanged.
Seize the Moment and Unleash your Memories
Set off on a voyage of effortless photo sharing and accessibility. Don’t allow format limitations to hold you back; your memories deserve to be free!
Who is using the HEIC Format?
Apple devices employ HEIC, including iOS and macOS devices. It was introduced as the default format for storing HEIF (High Efficiency Image Format) images. People who want to see photographs on other devices, such as Android or Windows, must convert HEIC to JPG.
HIEC files have up to 50% less space than JPG ones. Changing the image file format from HEIC to JPG can nearly double the size.
How do you convert HEIC to JPG on a Mac?
The built-in Preview program is the quickest way to convert a HEIC file to a JPG on a Mac. The highly effective online HEIC to JPG converter is also available for free and does not require installation. The HEIC to JPG converter has all of the required tools to make the process easy.
If you believe you will always want your images in JPG format, you can set the image default from HEIC to JPG. JPGs require a little more storage space, but they are extremely high-quality.
Here’s how to convert HEIC to JPG on a Mac:
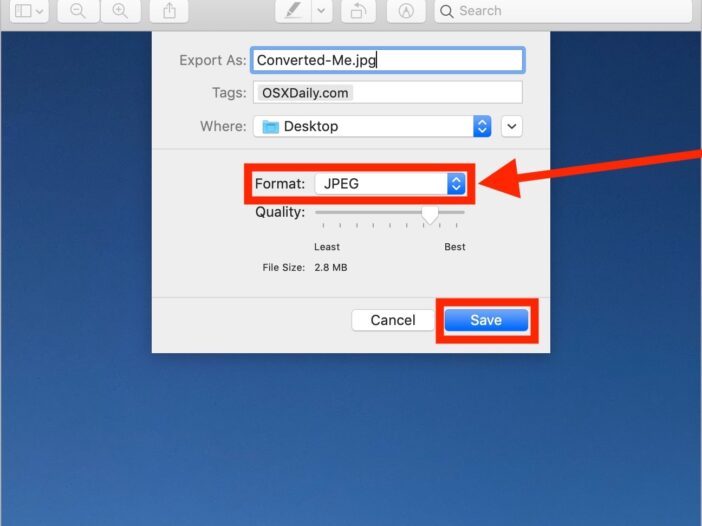
Use the Mac’s built-in Preview software to convert HEIC photos. Here’s how.
- In Preview, select the HEIC file to be converted.
- In the menu bar, select “File” and then “Export.”
- Select “JPEG” from the “Format” dropdown menu.
- Choose the destination for the converted file, and then click “Save.”
How to use your Mac to save HEIC to JPG.
If you’re saving or downloading a new image to your Mac, consider saving it as a JPG so you don’t have to convert it later for sharing.
How to save a web image as a JPG on your Mac:
- Ctrl-click the image.
- Select “Save Image As.”
- Choose JPG from the format drop-down selection.
If you wish to change your Mac’s default screenshot format from HEIC to JPG, execute the following command in Mac Terminal:
Defaults write com. apple. Screen capture type JPG.
Now you understand how to convert HEIC files to JPG. When you wish to convert a PDF into an image, you can do so using JPGs.
How can we simply convert HEIC to JPEG online?
Do you have compatibility concerns with your HEIC picture files? Don’t keep your valuable memories stuck in a format that isn’t generally accepted. Convert HEIC to JPG and share your memories online for free.
Using the HEIC to JPG converter tool, you can easily convert the image format. Just follow these three easy actions.
- Upload or drag and drop your HEIC image file into the input field.
- The tool will automatically convert your file to JPG format.
- Clicking the “Download” button will start the file download.
Wrapping Up
Converting HEIC to JPG on Mac has never been easier. In the post above, we simply showed how to convert HEIC to JPG on Mac computers. All you have to do is look into the conversion procedure. Converting HEIC to JPG is rather simple, whether you’re using a Mac, an iPhone, or both. In most circumstances, you won’t realize anything has changed. If you ever need to convert your photographs, the procedures we’ve shown you will work flawlessly.