
Are you having issues with Snapchat’s camera access? Do you receive a pop-up message requesting that you allow camera access on Snapchat, but you are unsure how to do it? You are not alone, to be sure. A large number of Snapchat users have received the same message.
Resolving this problem isn’t difficult, but it can be frustrating when you have no idea where to start. However, this article will show you everything you need to know about allowing camera access on Snapchat on iOS and Android.
Table of Contents
How to Allow Camera Access in Snapchat For iOS
If you are an iPhone Snapchat user, you will want to follow these instructions to allow the app camera access.
- Open the Settings app.
- Scroll down and tap on Snapchat.
- Toggle the Camera option to on (green means the feature is on/allowed).
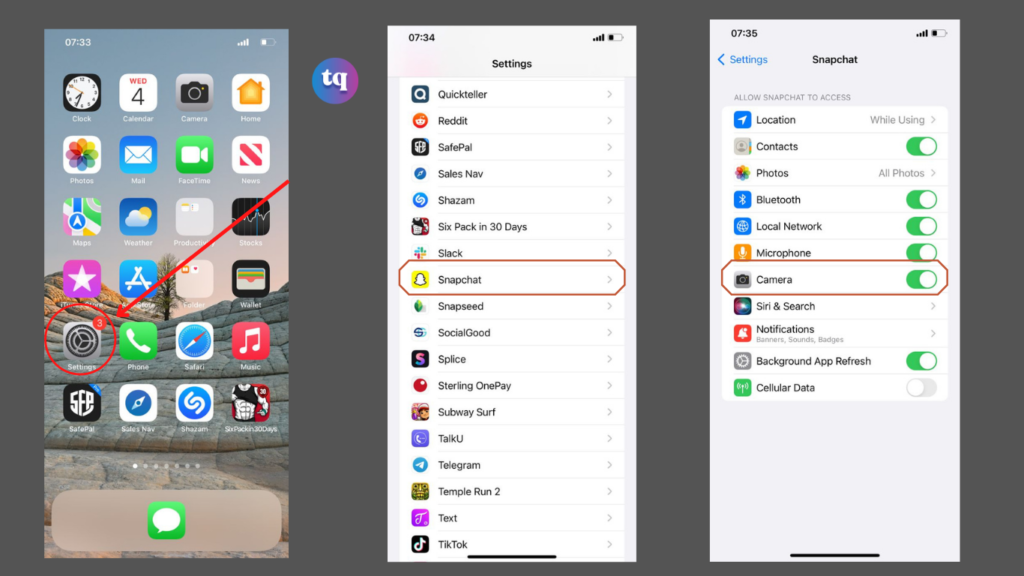
4. Open Snapchat and you will be able to use your camera.
How to Allow Camera Access in Snapchat For Android Users
The procedure for using your Snapchat camera on an Android device is slightly different.
NOTE: These instructions may vary slightly depending on the model of your device and the software version. To find the camera permissions quickly, use the search function in the Settings on your device.
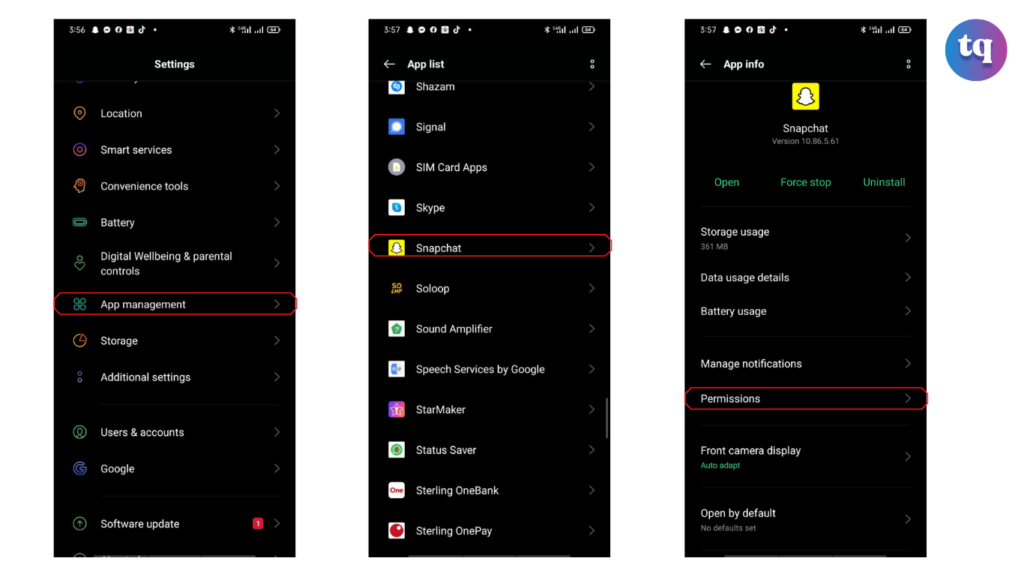
- Go to the “Settings” on your phone and tap on “Applications” (or Apps depending on the software version).
- Tap Apps or Apps & notifications or Apps Management.
- Scroll down and tap Snapchat.
- Tap Permissions (not pictured).
- Tap Camera to allow Snapchat to access the camera.
- Then choose permission for the camera. Some versions of Android provide two ‘On’ options: Allow only while using the app or Ask every time.
How to Allow Camera Access Within Snapchat
If you want to adjust your camera access, you can do so under your Snapchat settings. This will take you straight to your phone’s camera settings, allowing you to turn it on.
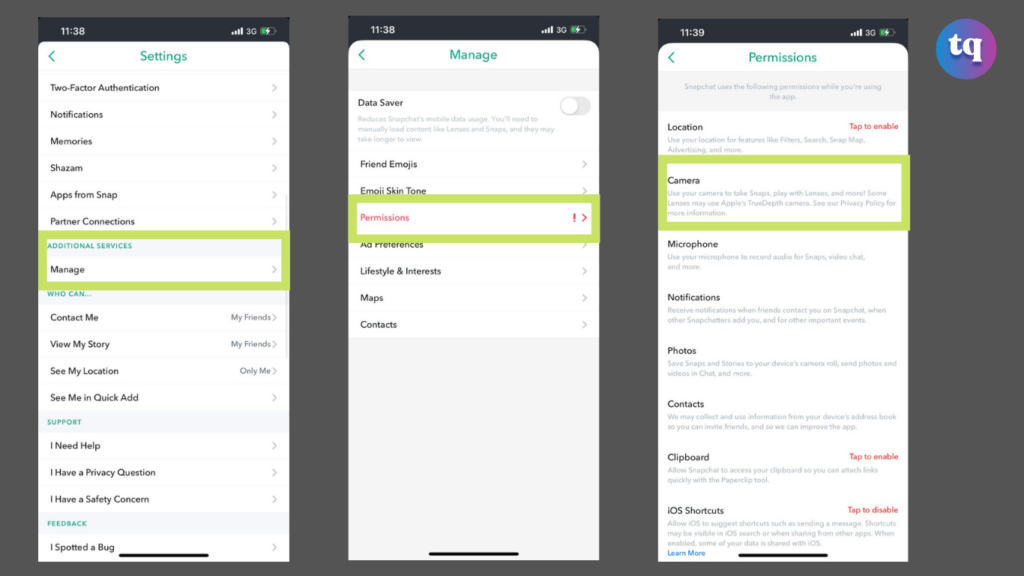
- In Snapchat, tap on your profile picture.
- In the top right corner, tap on the gear icon to open Snapchat’s settings.
- Scroll down to Additional Services and tap Manage.
- Tap Permissions.
- You will see all the permissions listed that Snapchat uses. If one isn’t currently enabled, you will see a red Tap to Enable button. Tap this to go into your phone’s settings and enable it. We highlighted the Camera since we are talking about camera access permissions.
What to Do If Your Camera Still Isn’t Working
In most cases, the methods outlined above should work. Even after completing these steps, some iOS users have reported issues. An app limit on your Snapchat app, which means it will set your usage duration, is one possible reason for these troubles.
If this is the case, you will have issues using Snapchat because you may have reached your daily app usage limit. If that occurs, you should remove the app limit. Here’s how to do it:
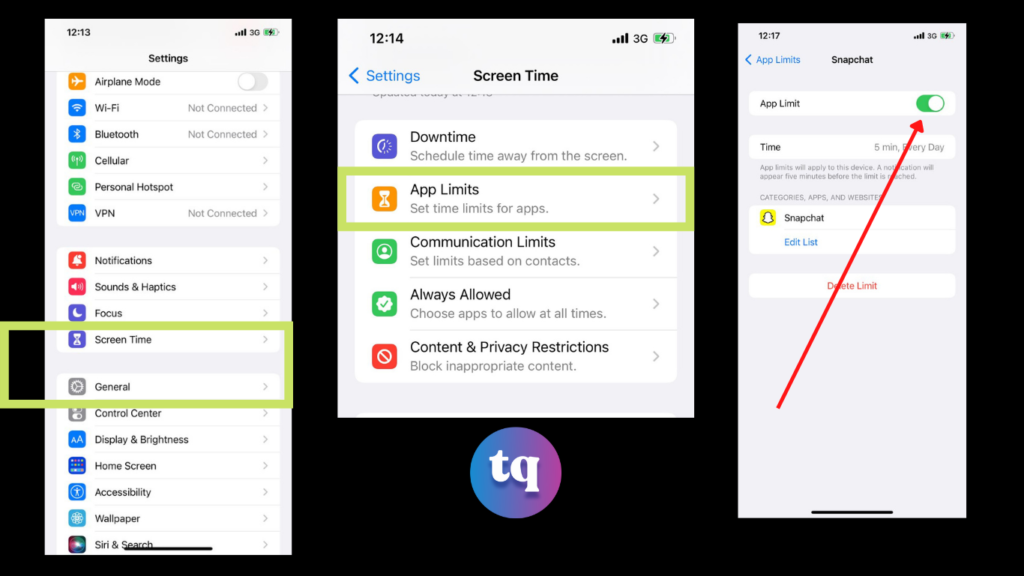
- Go to “Settings” and tap on “General” or “Screen Time,” depending on your device.
- Tap “App Limits” and find “Snapchat and Camera.”
- Next, you will have to Disable “App Limit” (toggle the button) and “Delete App Limit.”
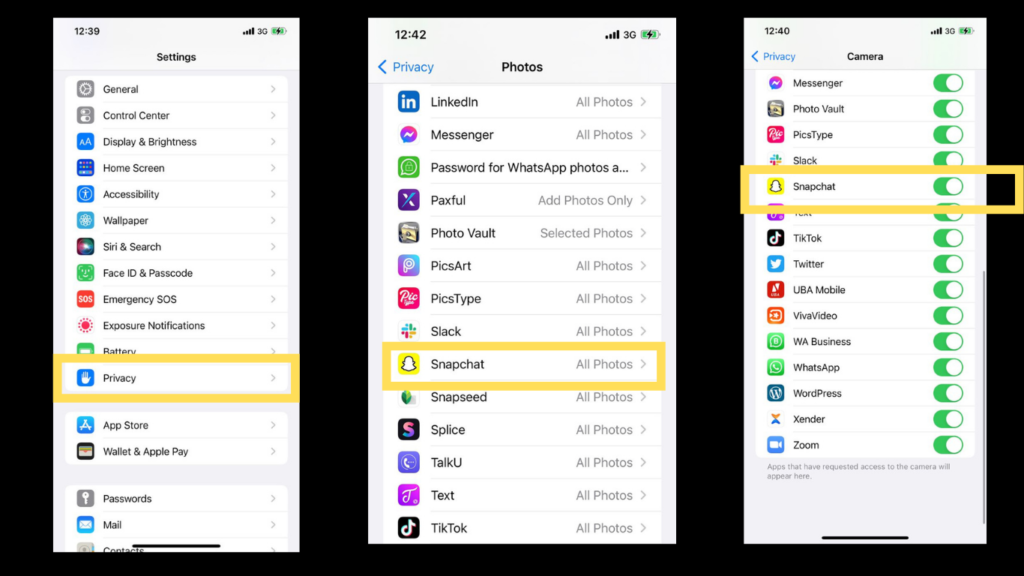
You might also have problems if there’s a general restriction on your Camera. This can cause several issues. Follow these steps to fix it:
- Go to the “Settings.“
- Select “Privacy.”
- Under Privacy, you will see an option for “Camera” and an option for “Photos.” Click on each one and verify that Snapchat is enabled.
- “Photos” should display “All Photos” while the “Camera” will show a toggle switch.
Other Solutions
You may have enabled Camera access in Settings or disabled the App and Camera limit, but you still see the annoying ‘Oops! Snapchat is a camera app’s message. If the error persists, try the troubleshooting options in the following section to tackle the issues.
CHECK OUT: What Is Quick Add On Snapchat?
Turn Your Phone On/Off
The good old turn-on/off method often works in these situations. By doing so, you get rid of the RAM (random access memory) that increases over time and slows down your device and apps. Therefore, your device gets more storage space.
Make sure your phone is turned off for two to three minutes. Then you can turn it back on. This may resolve your issue permanently. If it doesn’t, there are other steps you can follow.
Delete Your Snapchat Cache
Your phone’s cache needs to be cleared now and then. Over time, all apps accumulate a certain amount of cache, which allows them to run faster and more efficiently. Over time, too much cache might accumulate on your smartphone, slowing it down.
You can free up a lot of space on your phone by removing the Snapchat cache. You might be concerned that this will erase all of your snaps, messages, and memories. Don’t worry; emptying the Snapchat cache won’t affect these. Furthermore, any Snapchat or videos saved to your phone’s gallery will be protected.
Whether you are using an Android or an iOS device, the steps are the same. The only difference is that when you get to the third step on an iOS device, you will have to select and erase all app cache. Here’s how to do it:
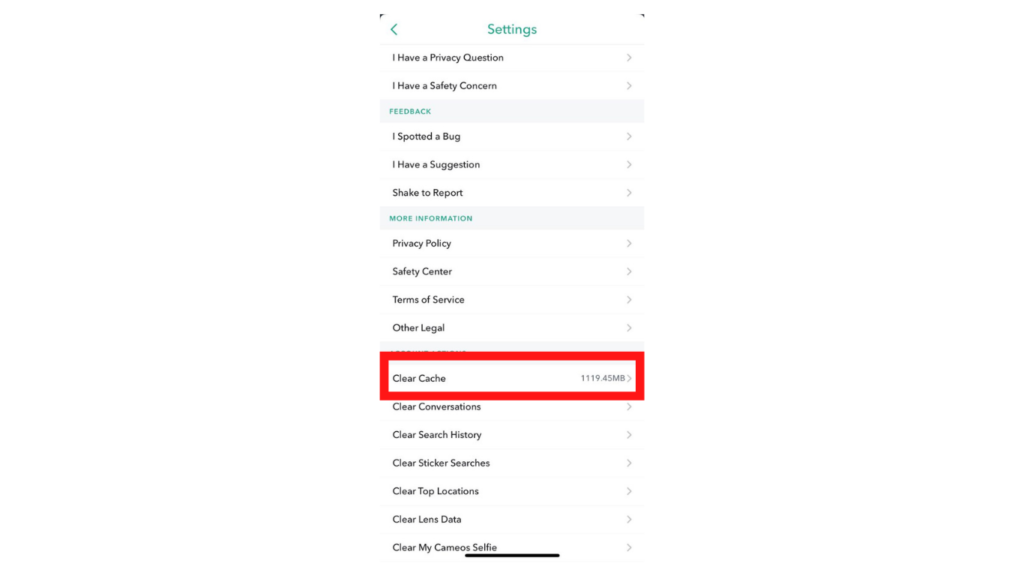
- Tap on the “profile photo icon” in the upper left corner of the screen.
- Next, tap on the “Settings” in the right upper corner of the screen.
- Scroll down, find “Clear Cache,” and tap it.
- You will get a pop-up message, asking you if you want to continue with the operation or cancel it, tap “Clear.”
Update Your Snapchat
Making sure your app is up-to-date is crucial. The updates remove any errors or bugs in previous versions. Here’s how you can see if your Snapchat is running on the latest version.
If you are an iOS user:
- First, go to the “App Store” and locate “Snapchat.”
- Tap “Update” if it’s available.
Use this method if you are an Android user:
- Go to the “Play Store” and locate “Snapchat.”
- Tap “Update” if it’s available.
By following this step, you will know for sure if the Snapchat you are using is up-to-date.
Reinstall Your Snapchat
On occasion, something might go wrong during the installation process. If you have tried everything and still can’t fix the camera access issue, it’s best to uninstall Snapchat and reinstall it.
Check Your Internet Connection
If you are having problems with your Snapchat camera, try turning off wifi and connecting to cellular data, or vice versa.
Snapchat is an internet-based application that requires a strong, steady internet connection to function.
Bottom Line
Now you shouldn’t have any further problems allowing camera access on Snapchat. This problem can be aggravating, so find a solution that works best for you. Be sure to check if Snapchat is allowed access to your camera and if there isn’t an app limit or camera restriction. If everything is in order, proceed to the next steps, such as turning your phone on/off or reinstalling Snapchat.
Have you ever had an issue like this before? Did any of these ideas help you? Please share your thoughts in the comments section below.
FAQ on How to Allow Camera Access on Snapchat
Go to the “Settings” on your phone and tap on “Applications” (or Apps depending on the software version). Within the Applications window, tap on “Snapchat.” Tap on “Permissions.” Finally, check that the Camera button is Green/Enabled.
1. Open the Settings app.
2. Scroll down and tap on Snapchat.
3. Toggle the Camera option to on (green means the feature is on/allowed).
4. Open Snapchat and you will be able to use your camera.
Go to the “Settings” on your phone and tap on “Applications” (or Apps depending on the software version).
Tap Apps or Apps & notifications or Apps Management.
Scroll down and tap Snapchat.
Tap Permissions (not pictured).
Tap Camera to allow Snapchat to access the camera.
Then choose permission for the camera. Some versions of Android provide two ‘On’ options: Allow only while using the app or Ask every time.
This is an error message that Snapchat delivers when the app isn’t detecting your camera. Snapchat either doesn’t have access to your camera or has a software problem if this text appears. In some cases, there may even be a hardware problem. If your camera isn’t working at all, it’s likely the latter. The error should be resolved by following the methods we’ve discussed above.
One common problem that many iOS users have come across is the missing ‘Camera’ option in their phone’s settings. First, make sure that iOS is up-to-date. If you are running much older software on your phone, it’s not likely to recognize the needs of newer versions of the Snapchat app (in this case, the camera).
A blurry image is another fairly common issue for many users. If you’ve followed the steps above to clear the cache and make sure everything is updated, the next step would be to ensure that the camera housing is clean and debris-free. This is especially important for phones that have liquid or physical damage. Over time, dust particles and corrosion can impact your camera.
Reference:
- alphr.com – allow camera access to Snapchat
COPYRIGHT WARNING! Contents on this website may not be republished, reproduced, or redistributed either in whole or in part without due permission or acknowledgment. All contents are protected by DMCA.
The content on this site is posted with good intentions. If you own this content & believe your copyright was violated or infringed, make sure you contact us at [techqlik1(@)gmail(dot)com] and actions will be taken immediately.